At The Knitting Garage at AL Stickles
I only got about three more rows done on The Fortune's Wheel; it has been busy at the shop which is a good thing. I am always happy to meet new knitters from around the country :)Also Leah came back from her family ski vacation full of new ideas and gave the shop a little facelift. Spoiler-alert: There are some more changes in the air :)
At Home
Owl Sweater
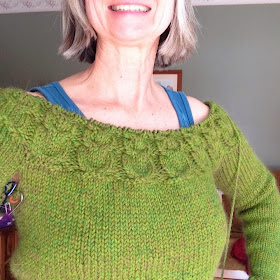
I have finished the two sleeves for my owl sweater over the last weekend. After following instructions for the first sleeve I frogged it and re-knitted with the increases more spaced (every 8th row) for a more tapered look. In the pattern all increases were done right after knitting the ribbed cuff and I didn't like how the sleeves were more loose while the body is more fitted, now both are fitted but not tight.I finished the owls yesterday. I am admiring them a lot; it is amazing how a few cables and purl stitches can create the image of an owl. Mine will be sleeping owls except perhaps a pair in the back.
After finishing the yoke I used the stretchy YO bind off for the neck and a new method of "neaten the last stitch of your bind off in the round " I had come across on knitfreedom.com
I also kitchener stitched the underarm stitches together this morning.
I had two mishaps: At first I had decided on the Invisible Ribbed Bind-off a.k.a. Knit-One Purl-One and cut yarn a little over three times the neck opening only to realize that I am not sure how to use that bind-off on a knit 2 purl 2 ribbing. I then decided on the Yarnover Bind Off, but was a couple of inches short of yarn. I used the magic knot to add length to my yarn (for instructions on the "magic knot" see "what's on my needles week 4"). My normal way of joining yarn, especially yarn this thick is the way I had learned at school:
 1. You split the last six inches of your working yarn in half then you split the first six inches of the new yarn to be joined in half. This is especially easy with this 2-ply yarn.
2. Then you combine about one inch (enough for two to three stitches) of the old yarn with one inch of the new yarn , use this for the next two to three stitches and then use the new yarn. You will have four "tails" hanging which will be sewn in later.
The other mishap occurred when I tried the sweater on yet another time because I just love the feel and look of it. I tried it on after finishing all the knitting, but before grafting the underarm stitches together. Well, one of the stitch holders came undone and slipped out completely ( I heard a "ping" when it hit the bathroom floor tiles). I had to ask my son to try and put them back on the stitch holder for me while I was still wearing the sweater. I was worried that if I attempted to take the sweater off the stretching will just make the stitches run. I am happy to say it was a successful operation probably not at least because the thick yarn is not naturally slippery so the stitches pretty much stayed in place. But a big "Thank You" also goes to Matthew. (Note to self: I should start on the "Hood Scarf with Pockets" he asked me to knit for him.
This morning I sewed all loose ends in and kitchener stitched the underarm stitches. My sweater is now happily blocking. Here are two pictures one in the snow before blocking and one during blocking.
I am very, very pleased with it and hope it will dry quickly so I can wear it.
Socks for Tony
Now that I used up all the yarn which was given to me over the Holidays I started on the socks for my husband. This is my 200th project on ravelry!I gave this yarn to my husband as part of his Christmas present together with a finished pair of socks in the same yarn (Cascade Heritage) in grey. Remember I had started those on our road trip. The gift of yarn was a promise of things to come ;)
The color was sort of a joke although I know he likes red. We kind of laugh about a certain commercial advertisement for a specific University in which all the successful graduates wear red socks. I told Tony that he could change the yarn to a different color he’d prefer, but he stuck with red.
In this project I want to finally try out the Fish Lips Kiss Heel Construction. He likes to fish, so this should be very fitting (pun intended). I am using another pattern just for the numbers (cast on and toe increases).
On Monday I cast on using “Judy’s magic cast-on” from the book " Cast On Bind Off 54 step-by-step Methods by Leslie Ann Bestor". I am using two circular needles for the two at the time toe up socks.
.JPG)
.JPG)

.JPG)


.JPG)


.JPG)
.JPG)
.JPG)


